
The Rolfing® Ten Series
Completing a Rolfing Ten Series can be a transformational experience. We will work together systematically through every region of the body to integrate the body’s structure (shape) and function (movement). The Ten Series can be understood as a series of ten steps that map a process of change, meaning the content, number, and pacing of sessions are always adapted to meet the needs of the individual client. The Ten Series can be especially supportive for those who are ready to make a change in their lives, who want to move more easily and with less pain, who want to deepen their self-understanding and awareness, and who want to reset and establish a new foundation. Those who are just curious are always welcome too!
Below is a more detailed look at the goals and foci of each step. Regardless of where we are in the process, we maintain a holistic view of how your system is working to adapt to and integrate the changes as they build over the course of the series.
Steps 1-3: The Sleeve
Where am I?
Goals: Open the outer layers of connective tissue; establish safety and boundaries
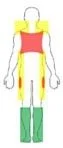
Step 1: Open the breath through work with the arms, ribcage, and diaphragm. Begin creating freedom in the pelvis and back through work with the upper leg, hamstrings, neck, and spine (red blocks).
Step 2: Establish a foundation of support through balancing the feet and lower legs (green blocks).
Step 3: Start connecting the front and back of the body by working along the sides of the body, beginning to build awareness of how the head, shoulder girdle, and hips are related to one another when standing under the influence of gravity (yellow blocks).
Steps 4-7: The Core
Who am I?
Goals: Go deep to create lasting support, balance, and ease; open to what matters
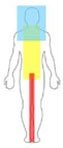
Step 4: Open the center line of support from the inside arch of the foot to the base of the pelvis (red blocks).
Step 5: Find ease in the core through the front of the body, working abdominals, psoas, and chest if needed (yellow blocks).
Step 6: Find support in the core through the back of the body from the heels to the upper back (yellow blocks).
Step 7: Balance the neck and head on the top of the body, extending the core from the base of the pelvis to the top of the head (blue blocks).
Steps 8-10: Integration
Where am I going?
Goals: Connect the deeper and outer layers; bring the whole body into easeful movement and coordination.
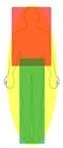
Steps 8 and 9: Depending on the individual needs of the client, Sessions 8 and 9 focus in turn on either the upper or lower body, ensuring a balance of support, adaptability, and dynamic movement throughout the whole (red and green blocks).
Step 10: Bring integration and congruency to the whole system, setting the foundation for years to come (yellow block).
*Images originally created by Matt Hsu, Certified Rolfer® and used with permission by the Dr. Ida Rolf Institute.